Rebuilding
All this meant that a major scenic rebuild was required. However, the first step was to re-train my 4mm scale ‘eyes’ to think and work in 7mm scale. Items such as stonework, road widths, bridges, buildings, doors and windows were all much larger than I was previously used to. This took some time to get used to. Eventually, by carefully thinking things through in advance and, when in doubt, calculating the scale size of components, I began to see the work in terms of 7mm scale.
Now confident to work in 7mm scale I quickly realised that few of the 4mm scale scenic techniques were going to be successful and the whole layout became a test bed for ideas and new methods. To try and reduce perspective effects and also cut corners, I elected to try and capture a representation of the overall scene, rather than to model individual blades of grass, and to have a series of ‘cameo’ set pieces designed to catch and concentrate the eye away from the overall scene. These individual scenes were to be detailed to the best of my ability. To some extent landscape artists employ this technique of giving the scanning eye something to focus on and thereby obtain a subtle impact. Although difficult for me to judge, the layout was been favourably received at exhibitions, so to some extent I guess that the principle has worked.
The general scenic base was built up in a variety of ways largely using whatever was to hand, the keynote being durability and lack of weight. Expanded polystyrene, newspaper, card and old sheets have all played a part.
Once the scenic base had been built up a plan of the details was drawn onto the layout. These included walls, fences, hedges, trees and the building locations. When finally happy that the best arrangement had been reached the details were added. Since I wanted to achieve a reasonably realistic rough grass texture I decided that it should be the last thing to go down. This was so that it could be made to look as if it were actually growing up around the other items and not just a flat surface with no depth.
The lightweight policy originally adopted went out of the window as soon as the scenic details were added. Rock cuttings were formed from real slate, split into thin (but still heavy) sections and assembled jig-saw fashion in a bed of plaster (just to add to the weight).
Quarry slate tips were formed at one end of the layout and represented by spreading a layer of shale (from the Rivendale Moors above Manchester) over the prepared base and applying a lot of diluted PVA glue. Some items were set into the shale, such as an old oil drum and the odd waste wagon accidentally tipped too far. The whole scene was one of the easiest and quickest to create and usually drew the most comment at exhibitions. The use of shale, although heavy, gives a remarkable scale effect and I am indebted to Malcolm Clarke for introducing me to this material.

Photo by Terry Onslow: I don’t have many pictures of the old slate quarry incline and waste tips ehich is a shame as I thought it was one of the best bits!
Road surfaces were covered in a mixture of ash, shale dust and W&T tarmac chippings. This mixture was glued down using white PVA, brushed on undiluted. The surplus was brushed off and saved for future use when the glue had dried. Any bald patches were filled with the same mix. Whilst the glue was still wet, the surface was pressed down well with a small roller (in this case a poster paint pot). The final road surface was sprayed with diluted PVA to seal in any loose particles and tinted/weathered with acrylic paints.
The river bed was built up from plaster, slate and shale. Smooth ‘calm’ water was represented by clear casting resin. Rough ‘white’ water was built up in stages using acrylic medium (used for thinning acrylic paints) which, although white when liquid, dries clear. This was highlighted with matt white paint when dry. I found that the clear casting resin, although fully cured and quite solid, retained a slightly sticky surface, so this was sealed with a coat of gloss varnish.
Walls were cast in plaster, ir situ, over a sheet of cling film, between two strips of Plasticene. Separate sections of up to 1 foot long were cast. The cling film stopped the wall from sticking to the scenic base. When dry the sections were carved to shape and stonework scribed on using an engineer’s scriber. Texture was applied by rubbing with a wire brush. Individual sections were glued down with white PVA and the joints filled with more plaster which was scribed and textured to match when dry. If I had thought about it beforehand I would have pre-coloured the plaster grey so that chips, etc., would not show up.

Photo by Terry Onslow: Outside the Post Office there is a hive of activity as the days business gets underway. Note the careful grouping of figures by ASS, branchline and Omen. Beyond the Telephone kiosk can be seen the railway waiting room based on the one at Pontfadog on the GVT. This is prototypically positioned across the road away from the station itself. The spear fencing and gates are Scalelink etchings.
The walls around the chapel required a different approach since these had railings set in the top. The railings were ScaleLink etches and were sandwiched between two strips of balsa wood cut to follow the profile of the scenic base. These were covered in plaster which was carefully applied to the desired height up the railings. Once dry, the plaster was attacked with the scriber and brush.
Tunnel mouths were also produced in much the same way, except they were cast in moulds constructed from plastic sheet. Bridges were built up from plywood and covered in a layer of plaster. Both were carved and treated in the same way as the walls.
Fences were built up from thin ply and stripwood, or from Slater’s and Webster’s posts. These were set into the scenic base and threaded up with either soft fine wire or cotton soaked in diluted PVA, left hanging with a weight until dry. The station fencing and gates were ScaleLink GW type etchings.
Small trees were made up from the Woodland Scenics range or built up from wire, covered in Woodland Scenics foliage. To cut corners, large tree, were purchased ready-made, these were ‘seconds’ from BTA. Originally intended as a stop gap measure, they were never replaced! Constructed on the ‘bottle brush’ principal, they are hardly accurate but did give an acceptable overall image.
Cart tracks, flower beds and vegetable patches, etc., were modelled using an ‘earth’ mix consisting of plaster, brown and grey powder paint, sawdust or tea leaves and a little PVA for binding. Depending on overall surface texture requirements, further applications of tea leaves or scatter materials were added. I should, perhaps, point out that the tea leaves had already been used for their intended purpose and represented a cheap alternative to scatter materials.
Having finished off all the other ground cover, a start could be made on the grass. As already stated, I wanted to cut as many corners as possible without too much compromise. In 7mm scale, coarse grassland would be anything from 5mm to 15mm tall and the thought of sticking clumps of sisal string over some 30 square feet was mind-boggling, so an acceptable alternative was developed. The eventual method adopted used a ‘grass’ mix consisting of cheap coarse scatter mixed with diluted PVA to a moist consistency.
This mix was spread out to a thickness of approximately 6 or 7mm and stippled with a small, damp, stiff brush until the desired texture was achieved. Variations in thickness and texture were worked in and ‘clumps’ of grass built up around fence posts and walls. Once dry the surface was tinted or coloured a variety of subtle shades appropriate to the type of grassland depicted. I am no artist and my interpretation of colour may not have correspond with that of others but I was happy with the result and most of the viewing public seemed to agree (but they probably weren’t artists either!).

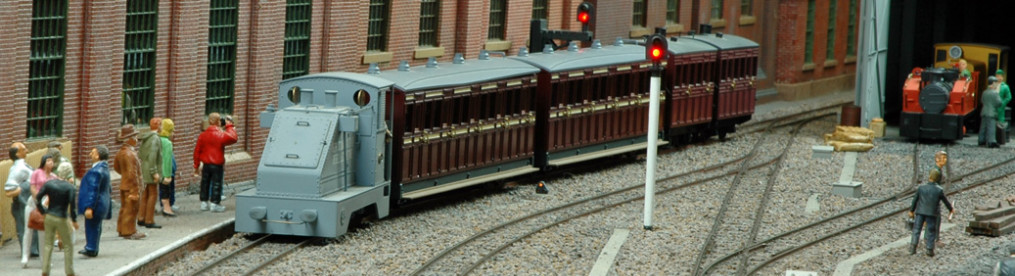
Photo by Len Weal courtesy of Railway Modeller: The Baldwin hauls a mixed train out of the station passing a petrol tanker which is due to make a delivery to the garage.
General undergrowth, gorse and brambles etc., were represented using rubberised horsehair or dressmakers acrylic wadding (sheet form) teased out and sprayed brown/grey. Layers of these materials were glued down, teased out and trimmed to the required shape and covered in scatter materials.
The story continues on the Buildings page.
Click here to return to the main Dyffryn page.